
July 4th Red Velvet & Cream Cheese Flag Cake
-
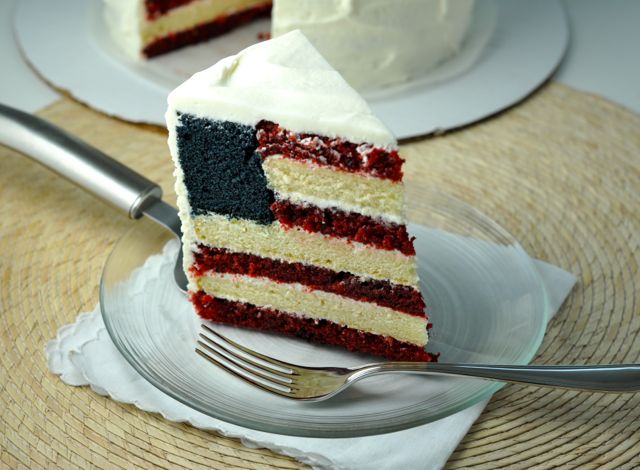
I know. It’s impressive. It’s so… American.
You can’t not sing the national anthem (or at least hum it in your head) after slicing into this patriotic cake. You can’t not see fireworks after stabbing your fork into the layers of Red Velvet Cake and Buttermilk Vanilla Cake glued together with Cream Cheese Frosting. And you can’t not love the medley of desserts baked into one freaking adorable flag shape, even if it does take you days to prepare and almost resent the very holiday you’re baking it for because you have to make so many freaking layers, in different colors, and that takes Planning, with a capital P.
I saw a similar cake in my Food magazine this month, and knew I had to bastardize it. The original recipe called for alternating layers of ice cream (for the white layers) and sorbet (for the red layers), which so wasn’t going to work for me since we’re driving this cake for like an hour on what is hopefully going to be a warm day. Besides- isn’t a Red Velvet & Buttermilk Vanilla layered cake better than a frozen situation? Me thinks so too.
So happy 4th… I say that gives us all a license to go for 4 servings.
Adapted from my Red Velvet Cake and Buttermilk Vanilla Cake recipes…
RED VELVET CAKE LAYERS (for red layers):
2 cups all-purpose flour
2 tablespoons unsweetened cocoa powder
1 teaspoon baking soda
1 teaspoon baking powder
1 teaspoon salt
2 cups sugar
1 cup vegetable oil
2 eggs
1 cup buttermilk
2 teaspoons vanilla extract
1 – 2 oz. red food coloring (2 – 4 tablespoons)
½ cup hot coffee
1 teaspoon white distilled vinegar
BUTTERMILK VANILLA CAKE LAYERS (for white layers):
1 ⅔ cups all-purpose flour
1 ½ teaspoons baking powder
½ teaspoon baking soda
¼ teaspoon salt
¾ cups + 2 tablespoons buttermilk
1 ½ teaspoons vanilla extract
½ cups unsalted butter, at room temperature
¾ cup sugar
3 eggs
BUTTERMILK VANILLA CAKE LAYERS (for thick blue layer):
1 ⅔ cups all-purpose flour
2 tablespoons unsweetened cocoa powder
1 ½ teaspoons baking powder
½ teaspoon baking soda
¼ teaspoon salt
¾ cups + 2 tablespoons buttermilk
1 ½ teaspoons vanilla extract
½ cups unsalted butter, at room temperature
¾ cup sugar
3 eggs
28 drops of royal blue gel food coloring
4 drops of violet gel food coloring
FROSTING:
1 1/2 blocks of cream cheese, softened (totaling 12 oz., or 1 1/2 cups)
3/4 cup softened butter (1 1/2 sticks)
1 1/2 teaspoons vanilla
5 cups confectioners’ sugar (more or less, depending on how you prefer the consistency)
- RED LAYERS- RED VELVET CAKE:
- Preheat oven to 325° and grease two 8″ cake pans; set aside.
- In a medium bowl, whisk together flour, cocoa powder, baking soda, baking powder, and salt; set aside.
- In a separate large bowl, combine the sugar and vegetable oil. Beat in eggs, buttermilk, vanilla and red food coloring until well combined. Stir in the hot coffee and vinegar.
- Gradually combine the dry ingredients with the wet ingredients (in about four additions of mixing dry into wet, scraping bowl between each addition), mixing until just combined.
- Pour the batter evenly into prepared pans and bake for 40 minutes, or until a cake tester comes out mostly clean of crumbs. Be careful not to over bake! Allow pans to cool on a cooling rack for about 10 minutes, then remove cake from pans and finish cooling on the rack. Store in fridge before slicing both layers into halves, so you end up with FOUR layers.
- WHITE LAYERS- BUTTERMILK VANILLA CAKE:
- Preheat oven to 350˚, and grease two 8″ cake pans.
- In a medium bowl, sift flour, baking powder and salt together and set aside.
- Pour buttermilk into a measuring cup and stir in vanilla.
- In a large bowl, cream butter and sugar together with an electric mixer at medium speed until light and fluffy (about 4 minutes). Reduce the speed and add the eggs one at a time, beating for 30 seconds between additions.
- Add alternating increments of the flour mixture and the vanilla-buttermilk, blending well after each addition (starting and ending with the flour mixture); this should take up to 5 minutes.
- Pour batter into greased cake pans and bake for 30 minutes (or until a cake tester comes out clean). Remove from oven and let cool for 20 minutes on rack before unmolding from pans to finish cooling. Store in fridge before slicing both layers into halves, so you end up with FOUR layers (you will only need three, just so you know).
- BLUE LAYER- BUTTERMILK VANILLA CAKE:
- Preheat oven to 350˚, and grease ONE 8″ cake pan.
- Make the same cake as above (for the white layers), with the following changes: add 2 tablespoons of unsweetened cocoa powder into step 2 (sifting in with flour mixture), and add 28 drops of royal blue gel food coloring and 4 drops of violet gel food coloring* into step 5 (so color is thoroughly mixed into batter).
- Pour batter into single cake pan and bake for 35 – 40 minutes, or until cake tester comes out clean. Store in fridge before cutting circle out of center (see point 5-2 below).
- FROSTING: In a large bowl, mix cream cheese, butter and vanilla well. Add confectioners’ sugar, one cup at a time, beating until smooth (scraping sides of bowl after each addition of sugar); add sugar until you have reached your desired consistency. Store in fridge until ready to use and bring to almost room temperature when ready to frost cake.
- ASSEMBLY:
- Place one red layer of cake on a cake plate, and spread a thin layer of frosting over top. Place a white layer of cake on
 top, and spread a thin layer or frosting over top. Repeat with another red layer, frosting, then another white layer with frosting.
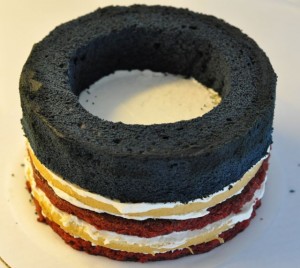
 - Cut a 5″ circle out of a piece of parchment paper or wax paper, and use it as a guide to cut a circle out of the center of the large blue cake layer. Place the blue “ring” over top of the frosted white layer of cake (like picture on right).
- Using the same parchment circle, use it as a guide to cut out two 5″ circles of red cake (one circle per layer of remaining red cake), and one 5″ circle of the white cake layer (you can save the remaining unused white cake layer for another use- you won’t need for this recipe).
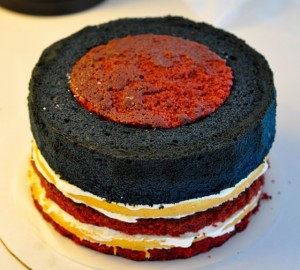
- Place one red small layer inside the blue ring of cake, spread a thin layer of frosting over top, then repeat with white layer, frosting, and red layer (like other picture on right).
- Frost cake with remaining cream cheese frosting, and chill before slicing. Store in the fridge.
- Place one red layer of cake on a cake plate, and spread a thin layer of frosting over top. Place a white layer of cake on
Tips:
- Ideally you will line your cake pans with 8″ parchment circles so they release easier. Not totally necessary though.
- If you’d like, you can make a 9″ cake. I actually used 9″ pans for the red velvet cake and cut the edges off to make 8″… a bit of a drag. I don’t have 4 cake pans in the same size so had to improvise… in the future I’d make this a wider 9″ cake. (Let’s be honest- this is a once-in-a-lifetime cake. I’m never making it again.)
- The Red Velvet cake is finicky. After chilling and slicing into 4 layers, freeze until ready to use or keep in fridge… this is a moist cake so you will need to work with it while it is cold.
- *Gel food coloring? Yeah. Wilton makes them… they are more concentrated than drops.
- Frosting the cake is easier if you do a light “crumb coat” first… spread a thin layer (which will drag some of the cake crumbs around) over the sides and top of the cake, allow it to chill, then add the thicker coating which won’t have the pesky crumbs to get in your way.
- Enjoy! (This takes so long to make that you’d better enjoy it when it’s all said and done.)
Related Recipes & Posts:
- RED LAYERS- RED VELVET CAKE:
Leave a Reply

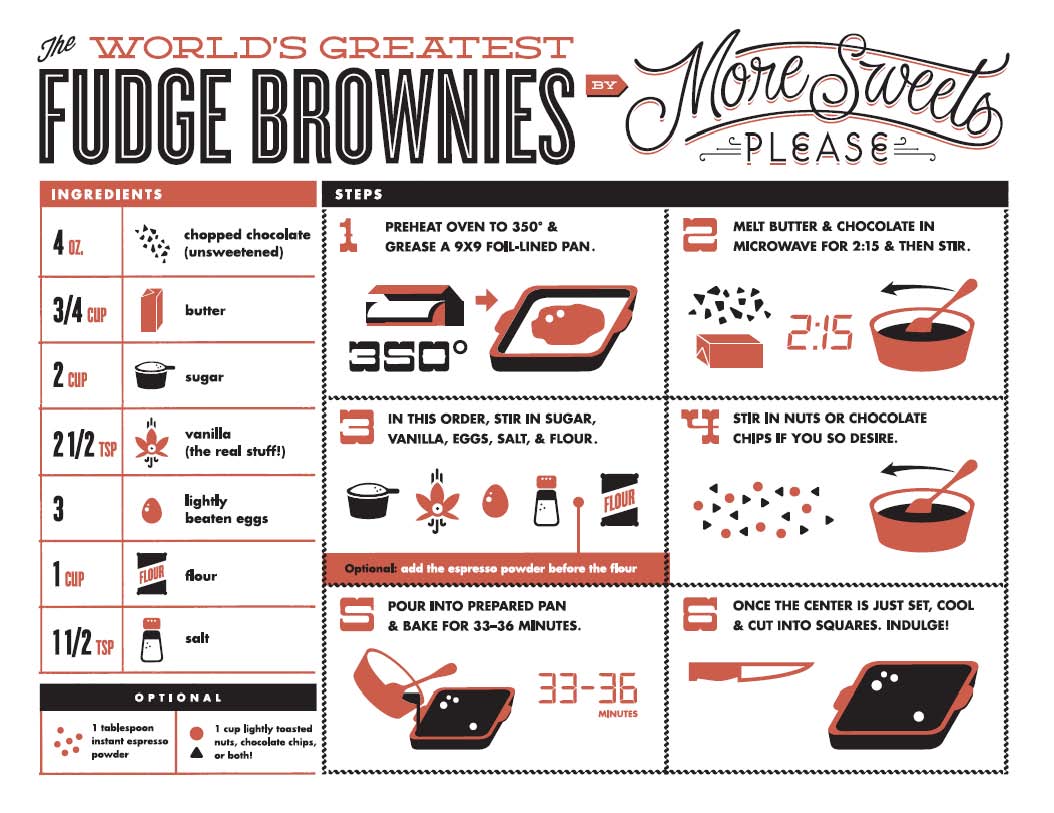
World’s Greatest Brownie Apron- Buy Me Instantly!
More Sweets, Please!
This Cake is Not a Mirage.
World’s Greatest Brownie Kitchen Towel for Purchase!


The Bingeworthy Brownie…


2 Responses and Counting...
This is incredible – you are so talented…
Aw shucks- thanks for the kind words!