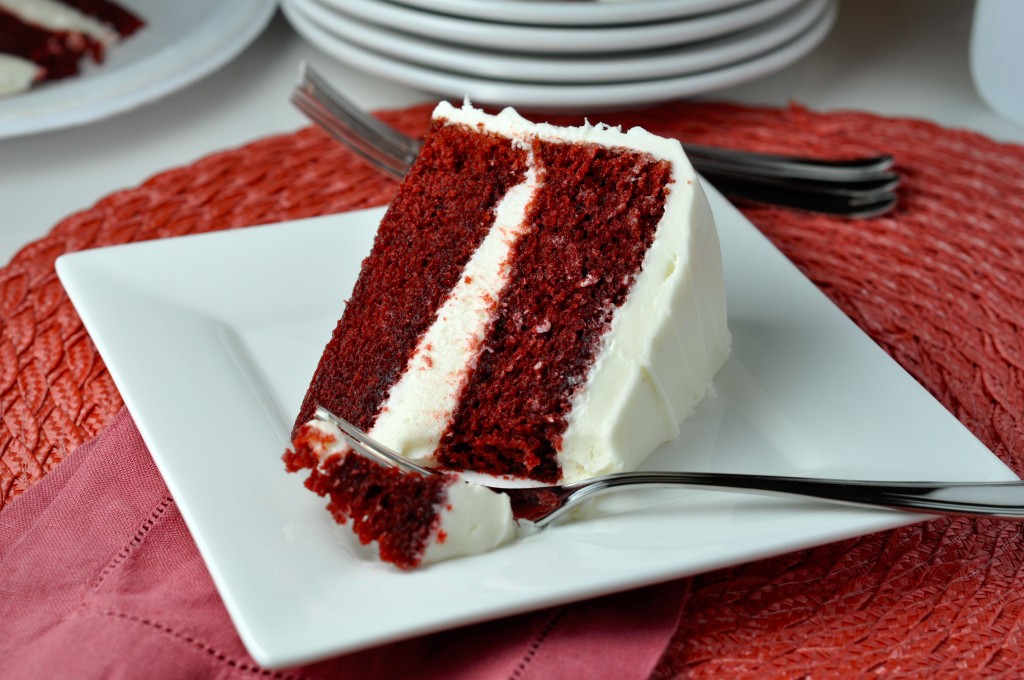
Red Velvet Cake
-
Finally, I understand what all the fuss is about.
I was living under a bit of a rock, I’m afraid.
But now I’ve seen the light. I’ve baked my way into it and there’s no turning back.
I’m talking about this glorious Red Velvet Cake, which is rich, moist, and almost crushed under the weight of its cream cheese frosting (seriously- look at the photo- the middle layer of frosting is almost as thick as the bottom layer of cake, which is squashed and giving up all hope. All of that is good, good stuff. Good cake problems to have.).
I present this masterpiece to you on the cusp of Valentine’s Day, so you can bake your way into the heart of the one you love the most (this person might be yourself, by the way— imagine how fulfilling it would be to bake this for YOU and YOU ALONE? Screw sharing and partnership and equal sized pieces- bring on the cake for one.).
Adapted from Divas Can Cook’s recipe…
CAKE:
2 cups all-purpose flour
2 tablespoons unsweetened cocoa powder
1 teaspoon baking soda
1 teaspoon baking powder
1 teaspoon salt
2 cups sugar
1 cup vegetable oil
2 eggs
1 cup buttermilk
2 teaspoons vanilla extract
1 – 2 oz. red food coloring (2 – 4 tablespoons)
½ cup hot coffee
1 teaspoon white distilled vinegar
FROSTING:
1 1/2 blocks of cream cheese, softened (totaling 12 oz., or 1 1/2 cups)
3/4 cup softened butter (1 1/2 sticks)
1 1/2 teaspoons vanilla
5 cups confectioners’ sugar (more or less, depending on how you prefer the consistency)
- Preheat oven to 325° and grease two 9″ cake pans; set aside.
- In a medium bowl, whisk together flour, cocoa powder, baking soda, baking powder, and salt; set aside.
- In a separate large bowl, combine the sugar and vegetable oil. Beat in eggs, buttermilk, vanilla and red food coloring until well combined. Stir in the hot coffee and vinegar.
- Gradually combine the dry ingredients with the wet ingredients (in about four additions of mixing dry into wet, scraping bowl between each addition), mixing until just combined.
- Pour the batter evenly into prepared pans and bake for 30-40 minutes, or until a cake tester comes out mostly clean of crumbs. Be careful not to over bake! Allow pans to cool on a cooling rack for about 10 minutes, then remove cake from pans and finish cooling on the rack.
- FROSTING: In a large bowl, mix cream cheese, butter and vanilla well. Add confectioners’ sugar, one cup at a time, beating until smooth (scraping sides of bowl after each addition of sugar); add sugar until you have reached your desired consistency*. Frost the cake when the cakes have cooled completely.
Tips:
- The whole red food coloring thing. Yeah, it’s worth a discussion. I had no idea how much of the stuff was involved in this kind of cake until I started testing recipes, and holy kamoly- most recipes call for a crap load of dye. The internet is full of articles that don’t like food coloring (just like how there are a lot of articles against things like cake and frosting), which is a tad disconcerting. SO- I use as little as I can while still trying to create a cake that looks red. One or two ounces should do the trick, so start with one ounce (2 tablespoons) and see if you need more. Depends on how dark your cocoa powder is… I used Guittard’s Rouge cocoa powder so didn’t need the full two ounces of food coloring.
- Buttermilk is key. Don’t use regular milk unless you want a cake that reeks of “good” but not “great”.
- *Frosting too thick? Thin with a bit of milk and beat until smooth.
- You might end up with extra frosting, even after slathering sinfully thick layers of it on the cake. You can freeze the icing in an airtight bag (like a frosting piping bag or a ziploc). Pull out the frosting when you want to cover something like the Mocha Cupakes with Cream Cheese Frosting, or when you want it to dip a piece of Blueberries and Cream Pound Cake into.
- Yes, this cake freezes really well. Wrap it tightly and just thaw in the fridge.
- Enjoy!
Related Recipes & Posts:
Leave a Reply

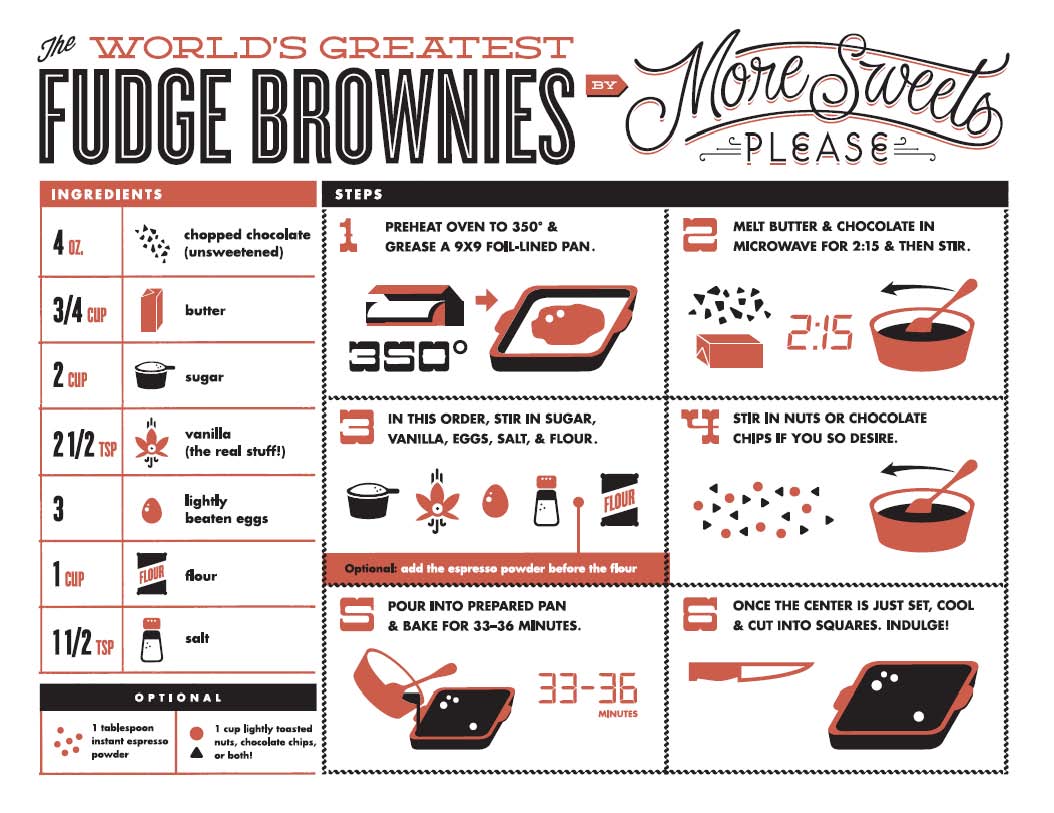
World’s Greatest Brownie Apron- Buy Me Instantly!
More Sweets, Please!
This Cake is Not a Mirage.
World’s Greatest Brownie Kitchen Towel for Purchase!


The Bingeworthy Brownie…