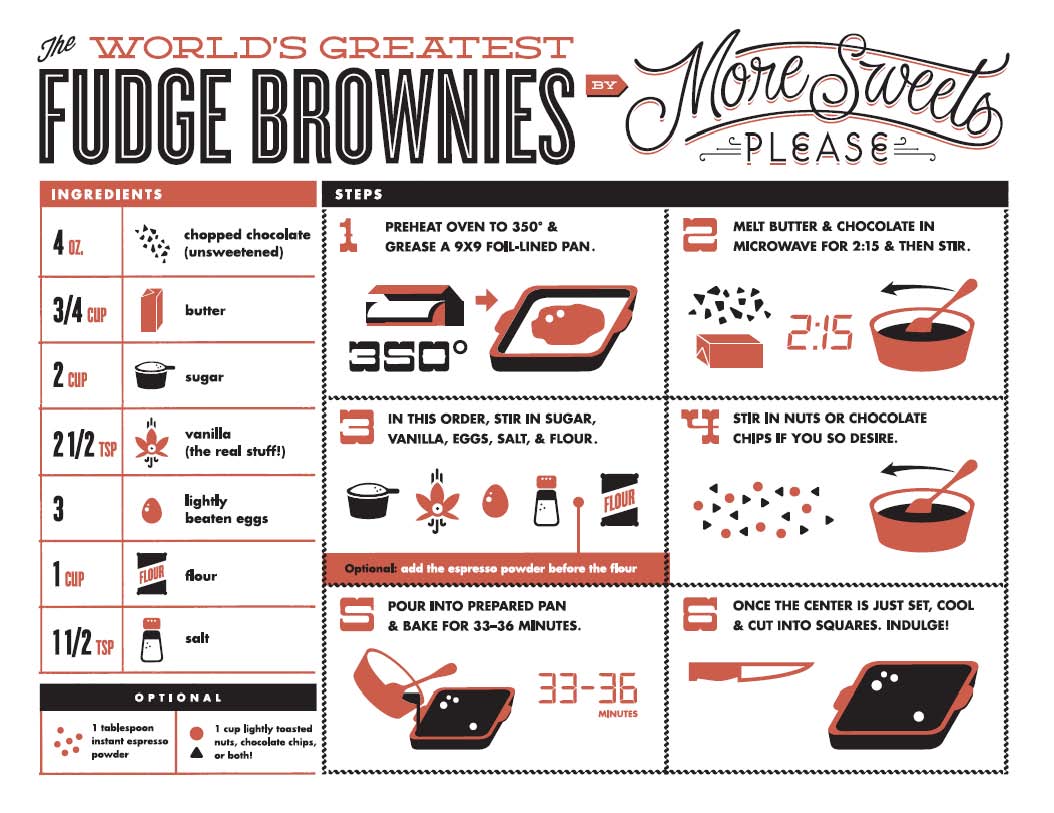
Pineapple Coconut Galette
-

It’s almost too cute to eat.
But that would be stupid, to not eat something this good.Here’s how the whole galette thing works (for me, at least): you take the leftover pie dough from a real pie you’re making (like the Decadent Deep Dish Pecan Pie or the Proper Peach Pie) and roll it out into a little circle. Dump your ingredients in the middle of the circle, then fold the edges up around the pile of yum- in a rough “I will prevent you from leaking all over my oven” kind of way. And that’s it.
Yes, you can (and should) make a big galette one day (with the pie crust you’d use to make a pie in an actual pie plate) instead of a couple of baby ones, but you get the point. (In case you didn’t get the point: they are great, they are easy, and they are great.)
CRUST:
One half of the dough from either of these double-crust recipes: Flaky Pie Crust, Flaky Vodka Pie Crust, Cream Cheese Pie Crust
1 3/4 cups pineapple, chopped into bite-sized pieces
1 cup shredded or flaked coconut
1/3 cup honey
- Preheat oven to 375° and line a baking sheet with parchment paper.
- Prepare dough of your choice according to directions, and after chilling, roll out one disk of dough (so half of a double batch) to about 10″. Transfer it to the parchment-lined baking sheet.
- Pour half of the honey onto the center of the dough, leaving a 2 – 3″ border (where you will fold/roll the dough up), then place the pineapple and coconut over the honey. Drizzle the remaining honey over the pineapple and honey.
- Fold the edges of the galette up by starting with one section and folding it over the contents in the middle, then turning the baking sheet as you go to fold each area up.
- Bake a full galette for about 20 minutes (until golden brown and center looks bubbly); bake smaller galettes for about 12 minutes. Check often to prevent browning; cover with foil if crust appears to be browning quickly (especially the vodka crust). Allow to cool and enjoy while still warm or at room temperature.
Tips:
- The crust- really doesn’t matter which option you go with. The cream cheese one is better for beginners (because it’s just more malleable), and as for the vodka one- ALL of the vodka bakes away, so there won’t be a hint of it left, I promise. Regardless of which crust you choose, the beauty of a galette is that it doesn’t have to look perfect (it shouldn’t, really), so you don’t have to perfect the edges or anything. Rustic. Gotta love it.
- Brush the crust with anything before baking? You could brush a bit of egg over the crust, or a bit of cream. I used the vodka crust recipe for this galette and it didn’t need any kind of egg wash to look nice and golden, FYI.
- How much to fold over? It’s a good question. For galettes with very little juiciness (like the one here), you don’t need to fold over a lot of the crust. If you get creative and have a goopy filling, then you’ll want to use less and have more dough edge to fold over (so the galette will be smaller, but that’s okay). If you’d like to look fancier, just fold the edges up on top of one another, like an accordion.
- Getting creative? How about apples with cinnamon and honey? Or peaches and almonds with agave nectar? Cranberries with almonds, orange zest, and honey? Apples with pecans and maple syrup? Any fruit that won’t get super runny will work… just combine with any nut and you’re golden. By all means, you can stir the ingredients together and add a bit of vanilla… and sprinkle 1 – 2 tablespoons of sugar with your ingredients if they are a bit sour.
- Freeze- friendly? You bet. I have one in the freezer right now. But not for long.
Related Recipes & Posts:
Leave a Reply

World’s Greatest Brownie Apron- Buy Me Instantly!

More Sweets, Please!
This Cake is Not a Mirage.
World’s Greatest Brownie Kitchen Towel for Purchase!


The Bingeworthy Brownie…