Cream Cheese Pie Crust
-
 This is the absolute perfect recipe for pie bakers who aren’t used to (or interested in) fiddling with traditional pie dough. (Novices- you’ll feel like a pro. Experts- you’ll want to find ways to use this for every pie.)
Let’s be honest- you never know if you’ve added enough water to the flour and butter mixture in the traditional recipe, and rolling the dough can test the patience of the best of us. Yes, a traditional crust is a bit flakier (and I do respect the importance of a flaky crust), but when a newcomer crust in town tastes pretty pie-alicious, is unbelievably easy to make, AND rolls out into a foolproof crust… well this fool has found her go-to dough.Makes 1 pie crust for a 9-inch pie (double if you need a top crust)… adapted from Rose Levy’ Beranbaum’s “The Pie & Pastry Bible”
1 1/2 cups all-purpose flour
1/4 teaspoon salt
1/8 teaspoon baking soda
1/2 cup unsalted butter (1 stick), cold & cubed
4 ounces cream cheese (half of package), cold & cubed
2 teaspoons ice water
1 teaspoon apple cider vinegar
- Mix flour, salt and baking soda in a food processor, then add butter and cream cheese- pulsing to create a mixture with small and medium sized crumbs no larger than peas (you can do this by hand with a pastry cutter, of course).
- Combine water and vinegar together, then slowly drizzle into the food processor, pulsing to combine into a coagulated dough ball. Don’t over process.
- Shape dough into a ball, and cover with plastic wrap, flattening into a disc about 6 inches wide. Chill in the fridge for at least an hour.
- Roll dough out into a 12 inch circle, and place into the pie plate of your choice, trimming off the excess dough so that you have a half-inch overhang. Tuck the overhang under itself towards the pie plate, and crimp/decorate in the fashion you prefer. Chill the dough again for at least 15 minutes before using in your recipe.
- Bake as directed in your recipe… and enjoy.
Tips:
- No cider vinegar? You could replace with water, but know that your dough will be less flaky (the acidity in the vinegar does something to the gluten- but let’s skip the chemistry lesson).
- Decorating the edges: you can crimp the edges using your fingers (press the middle finger of one hand into a space created between the thumb and index finger of the other hand)… you can use a fork to create a decorative edge… or just leave as it is, letting the pie filling do the talking.
- Freeze the crust (either as the dough ball in step 3, or rolled out into a pie plate) for up to 3 months.
Related Recipes & Posts:
Leave a Reply

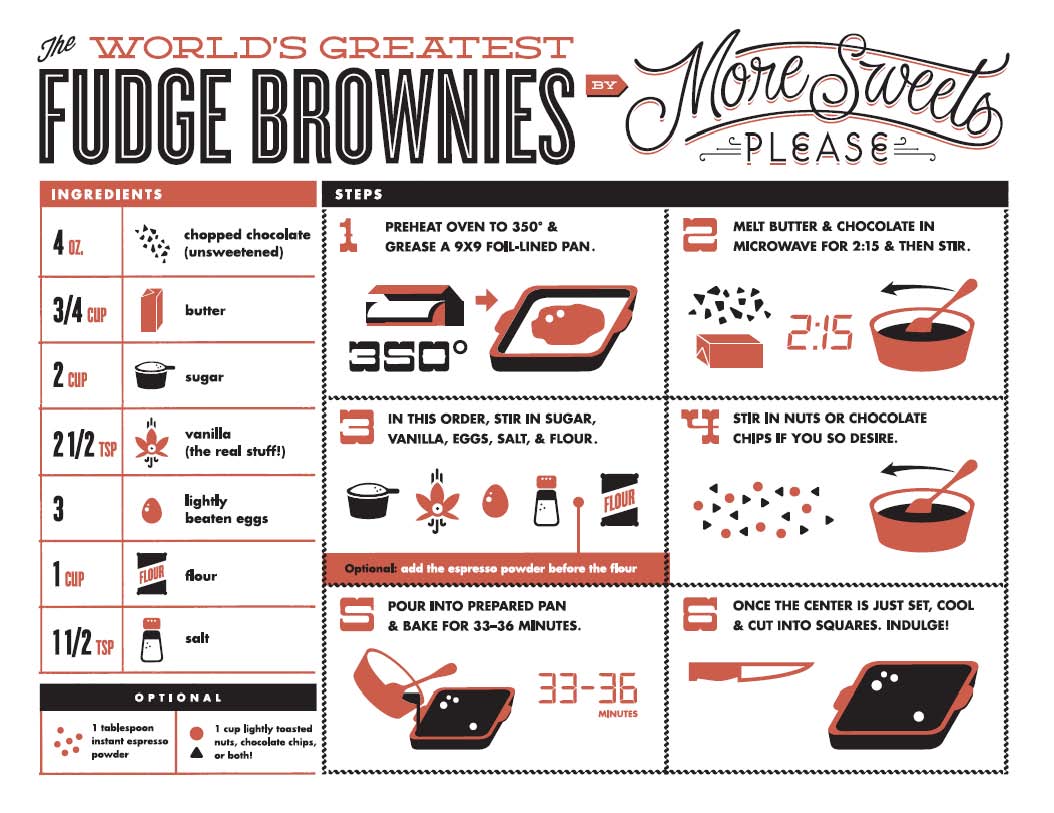
World’s Greatest Brownie Apron- Buy Me Instantly!

More Sweets, Please!

This Cake is Not a Mirage.
World’s Greatest Brownie Kitchen Towel for Purchase!


The Bingeworthy Brownie…