Shortbread Flowers
-
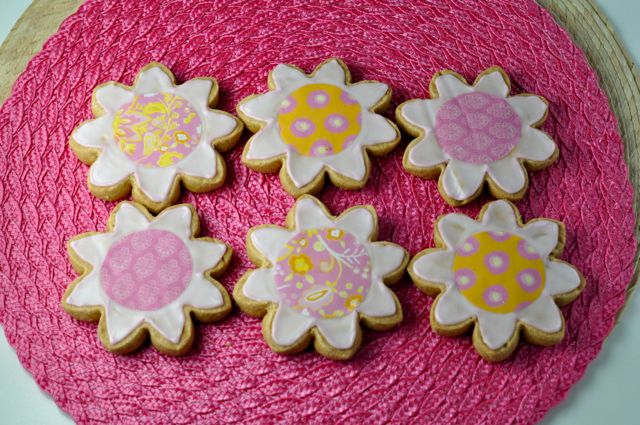
How sweet are these?
Because I am a world-famous blogger, I had the great fortune of having the people from Dena Designs send me a bunch of adorable edible papers… of course with the hopes that I’d not hate their product and refer to my experience under the Disasters category. Good news! The “Edible Designer Print” sheets were easy to use and covered up the imperfections in my icing. Gotta love that. Their designs look 750 times better than mine, but I never said I wanted to be a professional cake or cookie decorator.
The most challenging thing about making these cookies was deciding what designs to use. Oh, and not eating all of the cookies at once. Always takes restraint when dealing with shortbread, let me tell you.
Adapted from my Classic Shortbread Cookie recipe…
COOKIES:
2 cups all-purpose flour
1 1/4 teaspoons salt
1 cup (2 sticks) unsalted butter (room temperature)
1/4 cup granulated sugar
1/4 cup confectioners’ sugar
1 teaspoon vanilla
ROYAL ICING:
4 cups confectioners’ sugar
3 tablespoons Meringue Powder
6 tablespoons warm water
1/4 teaspoon vanilla
4 – 6 drops red food coloring (optional, for pink flowers)
- Sift flour and salt together in a small bowl and set aside. Cream butter with a stand mixer (or hand-held mixer) until light (2 – 3 minutes), then add sugar and beat for additional 2 – 3 minutes (scraping sides of bowl a couple of times throughout). Add vanilla. Add flour & salt combo and mix on low speed until dough is just incorporated together into a ball.
- Pat dough into a flat disc and wrap with plastic wrap; chill until very firm (at least an hour). Roll dough out to just under 1/2 inch thick (you might need dough to ‘warm up’ a bit to do this), and use a cookie cutter to cut out your desired shapes (flowers in this case, of course). Chill until cookie shapes are firm before baking.
- Preheat oven to 325°, and bake shortbread until firm to the touch and turning golden brown (about 15 minutes). Cool on a wire rack.
- ROYAL ICING: in a large bowl of a stand mixer, mix sugar and meringue powder together and add warm water, vanilla and food coloring. Beat with the whisk attachment for up to 5 minutes. Icing should be fairly stiff. Fill a small amount into a piping bag (with #3 piping tip if you happen to have), and pipe an outline around flowers and let dry for an hour. Add up to an additional tablespoon of warm water to remaining icing and whisk until smooth and the consistency of runny honey. Fill piping bag (with #2 tip if you happen to have) and flood flowers with icing up to the flower border you created earlier. Immediately place your Edible Designer Print shape onto wet icing and press gently to ensure paper has adhered to icing. Allow to dry for at least an hour or ideally overnight.
- Indulge!
Tips:
- Baking shortbread is a bit tricky because you think it’s done and it’s so not. Make sure it’s done- don’t cut the time short… like I have so many times before. Press it gently with a brave finger to see- if it’s still soft, don’t cave in and take it out of the oven.
- Want thicker shortbread? I made these flowers mucho-thick. I actually stuffed the dough into a large ziploc bag, flattened it out to be a consistent thickness, and then ripped the bag open at the seams after I chilled the dough overnight. I baked the flowers for almost ever (25 minutes) because they were so chunky, FYI.
- Enjoy! (Want more shortbread? Try the Espresso version, the Pecan Chocolate version, the Orange version, the Fruitcake version with Rum Glaze, or the White Chocolate Chip & Cranberry version, just to name a few…)
Related Recipes & Posts:
Leave a Reply

World’s Greatest Brownie Apron- Buy Me Instantly!

More Sweets, Please!
This Cake is Not a Mirage.
World’s Greatest Brownie Kitchen Towel for Purchase!


The Bingeworthy Brownie…